
Some  Home Console Stuff
My Wii™
In 2006 received an even better brand new gizmo as a present. Yes, I'd been given a Wii. All I can say is WOW. This truly was a new gaming revolution and enjoyed phenomenal success for it's generation.
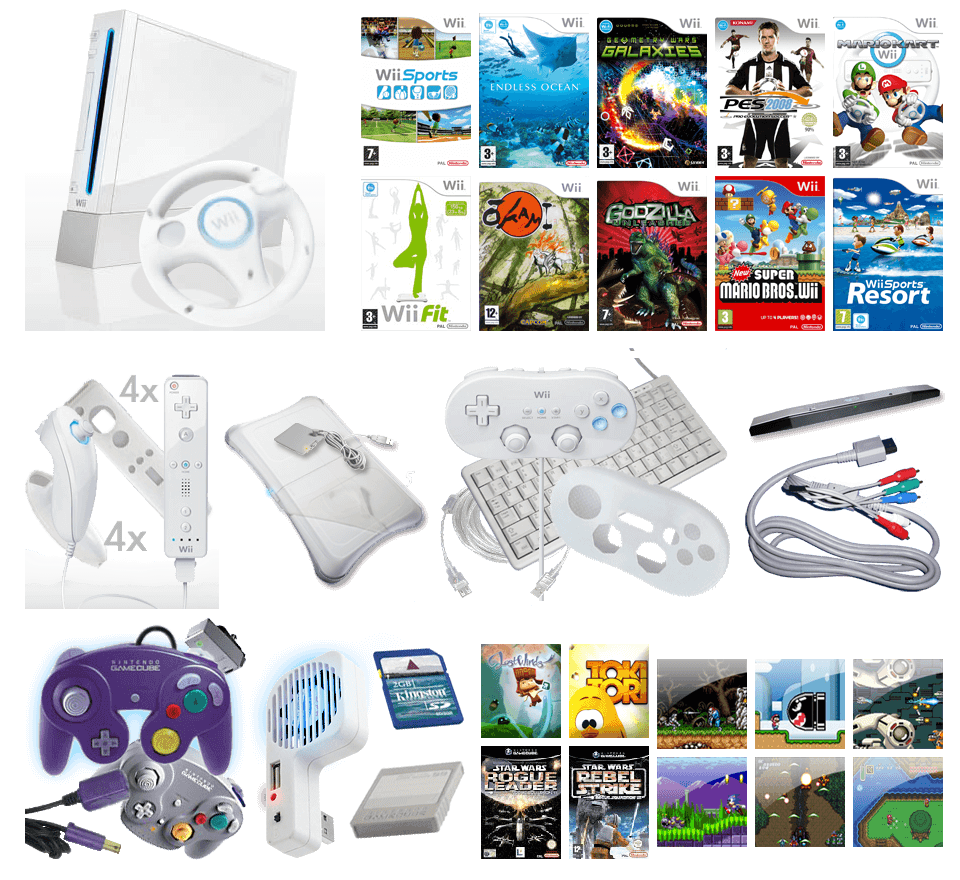
What I have (so far):
I use the Wii for all my 'next-gen' 3D environment games. 2D style games (such as strict platformers) are mainly bought for my DS lite.
After unpacking the Wii:
Internet; The Wii needs to connect to the internet to allow the first update.To set up the Wii for WiFi access via your home Apple network: Firstly, you probably have either OSX.3 or OSX.4...the best router by far is Apple's own Extreme BaseStation (allows you to share printer's as well as act as a router, access point and gaming point etc etc).
Turn it on...it sets itself up.
Now click on the "Airport Admin Utility" for some fine tuning (within the 'utilities' folder in 'Applications').
The types of encryption range from none (NOT a good idea), the next step up being WEP (this has been succesfully bypassed by people rendering it effectively useless), all the way to WPA (Wi-Fi Protected Access; created to be more secure than WEP). This newer WPA hasn't been compromised, but for added security, they renamed it WPA1 and created the second gen WPA2. As well as this, you can specifiy MAC filtering (called RADIUS) but I don't bother as it's mainly business's that use that type of high level security.
Now set up the basestation with WPA2 security and specify a 13 character password. The basestation will work well with mac's with any >8 length password, but non-macintosh systems mainly work well with specifically 13 character keys only.
Now specify that you want to allow both WPA1 and WPA2 computers to have access (not just WPA2). This way PC's (that mainly use the older WPA1) as well as most Mac's (that can use the newer WPA2) can all connect (provided they have the password of course).
It can get even more complicated in that Wi-Fi can be further subdivided into the type of security it uses...either TKIP (based on RC4) or AES (based on RC5). If you use a password to access the network, it is termed a PSK (pre-shared key)...yet another acronym to further confuse the issue. Don't worry about any of this. Generally if you use WPA, that utilises TKIP or sometimes AES whereas WPA2 only utilises AES for more security. The Wii can access either.
You can also set to allow devices that use the even older WEP technology to access, but I disabled this (i.e. why allow an inferior encryption technology access to your BaseStation?). Unfortunately, the DS uses WEP only, so it won't be able to connect with these settings.
Set the BaseStation onto "automatic channel selection" and also remember to use "interference robustness" (this allows for a better signal, especially if that signal has to go through/bounce off walls).
Finally, in the advanced settings, set the transmitter power to maximum and set the multicast rate: If you set the multicast rate too high, only clients on the network that are within range and can achieve the speed you set will receive transmissions, whereas if you set the multicast rate to 1 megabit per second (fairly low) this will extend the range of your network beyond the default, and allow more people to access.
Now send this info to the Basestation (it will turn off and boot up again) and that's it. You should now have a BaseStation with a 13 character WPA2 key which you can save in your keychain. The baseStation will also allow PC's and that use WPA1 encryption to connect as well as other Mac's and Wii's that utilise WPA2 (AES).
Now that it's set up, your Wii can do it's first update after the connection has been tested (if you get any error codes, note down the number and consult this site to check for a remedy). The Wii will reboot after the update and may need to do 2 or 3 before it is fully updated. Once done, you should now have the latest software on your Wii which will allow you to access the Weather Channel and News Channel, use Parental Controls and WiiConnect 24 as well as give you an Everybody Votes channel and a Mii Contest Channel.
The internet browser from Opera is now compatible with USB keyboards for easy text input (even though it's already quite good with Ninty's in built wiimote system) and costs 500points to download.
Learn more about the Channels available from the wiki.
A quick word on WiiConnect 24:
WiiConnect 24 allows the Wii to continually recieve updates and messages in the background despite being in a "standby" state. However, the way it's implemented on the Wii can be slightly confusing so I've made a flow chart to help clarify things: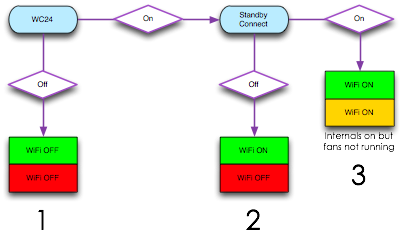
As you can see there are 3 ways of configuring your WiFi settings:
- WC24 is turned off. Therefore, whether the console is switched on (green LED) or off (red LED), the WiFi will never work. Also note that the path ends there, i.e. it doesn't matter what you set the Standby setting to, so console on = WiFi off and console off = WiFi off.
- WC24 is on, so the WiFi circuits are active when the console is turned on (green LED). However, Standby Connect is off, so when then console is turned off (red LED) the WiFi is turned off. So, with these settings, console on = WiFi on and console off = WiFi off.
- WC24 is on, so the WiFi circuits are active when the console is turned on (green LED). Now, Standby Connect is on, so when then console is turned off (amber LED) the WiFi is still running (i.e. it's "connecting" in "standby" - hence the term "standby connect"). So, with these settings, console on = WiFi on and console off = WiFi still on.
Note that in this setting, the WiFi circuits are always powered up, but the fans won't run in standby.
Addendum: Unfortunately, it gets more confusing as the system doesn't work as it should do as described above in real life. 2 actually acts like 1 in that WiFi is simply switched off at all times (rather than on when on and off when off). In order to get 2, what you have to do is set up as 3, but then remember to always manually power off for 5sec from the main console button instead. This will switch the LED from amber to red, so powering down the WiFi (don't use the wiimote to switch off).
My NES Classic Mini
I have recently got a new retro console which came pre-installed with 30 classic NES games. I ordered it directly from Nintendo UK and it came with a free keyring. I have since bought a couple of 3m extension leads for the controllers (my second one is the classic controller from the Wii) and am powering it from a dedicated 1A 5V USB power plug:
...I wish it had more games though because if it did, the games list might look something this with the original 30 mixed in:
1942, 1943: The Battle of Midway, Adventures of Lolo, Adventures of Lolo 2, Adventures of Lolo 3, Airwolf, Alien3, Arkanoid, Balloon Fight, Batman, Batman Returns, Battle Tank, Battletoads, Battletoads & Double Dragon: The Ultimate Team, Bionic Commando, Blaster Master, Bomberman, Bomberman II, Bonk's Adventure, Bubble Bobble, Bubble Bobble Part 2, Castlevania, Castlevania II: Simon's Quest, Castlevania III: Dracula's Curse, Commando, Contra, Cybernoid: The Fighting Machine, Defender II: Stargate, Dig Dug, Donkey Kong, Donkey Kong 3, Donkey Kong Jr., Double Dragon, Double Dragon II: The Revenge, Double Dragon III: The Sacred Stones, Dr. Mario, Dragon Warrior II, Dragon Warrior III, Dragon Warrior IV, Duck Tales, Elite, Excitebike, F-117A Stealth Fighter, Final Fantasy, Galaga, Galaxian, Galaxy 5000, Gauntlet II, Ghostbusters, Ghosts'n Goblins, Gradius, Guerrilla War, Gun Nac, Ice Climber, International Cricket, Jackal, Karnov, Kid Icarus, Kirby's Adventure, Life Force: Salamander, Mappy, Mario Bros., Mega Man, Mega Man 2, Mega Man 3, Mega Man 4, Mega Man 5, Mega Man 6, Metal Gear, Metal Storm, Metroid, Micro Machines, Mighty Bomb Jack, Millipede, Ms. Pac-Man, NES Open Tournament Golf, Ninja Gaiden, Ninja Gaiden II: The Dark Sword of Chaos, Ninja Gaiden III: The Ancient Ship of Doom, Pac-Man, Paperboy, Parodius, Punch-Out! Featuring Mr. Dream, R.C. Pro-Am, R.C. Pro-Am II, Rampage, River City Ransom, Rollerball, Silkworm, Solar Jetman: Hunt for the Golden Warpship, Spelunker, Spy Hunter, Star Soldier, Star Wars, Star Wars: The Empire Strikes Back, StarTropics, Stinger, Super C, Super Cars, Super Dodge Ball, Super Mario Bros., Super Mario Bros. 2, Super Mario Bros. 3, Super Sprint, Super Spy Hunter, Super Turrican, Tecmo Bowl, Teenage Mutant Ninja Turtles, Teenage Mutant Ninja Turtles II: The Arcade Game, Teenage Mutant Ninja Turtles III: The Manhattan Project, Tetris, The Legend of Zelda, Top Gun, Track & Field, Xevious, Xexyz, Yie Ar Kung-Fu, Zanac, Zelda II: The Adventure of Link, Zen: Intergalactic Ninja.
My SNES Classic Mini
I have recently got another new retro console which came pre-installed with 21 classic SNES games. I preordered it 3 months ago and managed to get hold of the good looking svelte EU version with multicoloured buttons, not the extremely ugly brick-like NA version. I am using the 3m extension leads for the controllers (the same ones for the NES mini work fine) and am powering it from a dedicated 2.1A 5V USB power plug which is also powering the NES (1A per console):
...and here are the games it comes pre-installed with:
Contra III: The Alien Wars™, Donkey Kong Country™, EarthBound™, Final Fantasy III, F-ZERO™, Kirby Super Star™, Kirby's Dream Course™, The Legend of Zelda™: A Link to the Past™, Mega Man® X, Secret of Mana, Star Fox™, Star Fox™ 2, Street Fighter® II Turbo: Hyper Fighting, Super Castlevania IV™, Super Ghouls 'n Ghosts®, Super Mario Kart™, Super Mario RPG: Legend of the Seven Stars™, Super Mario World™, Super Metroid™, Super Punch-Out!!™, Yoshi's Island™.
My 8BitDo Wireless Controllers
I have added to my above 2 classic consoles with some great wireless controllers:
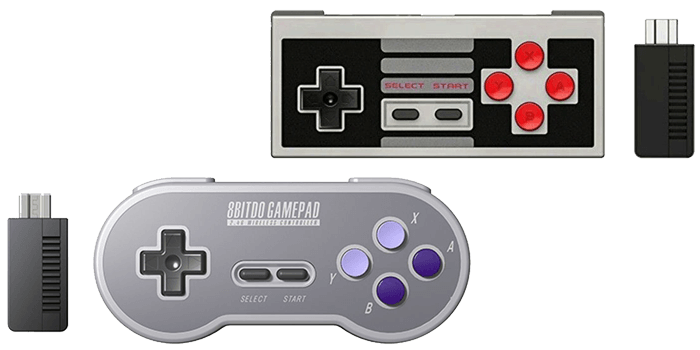
It's really nice to not be connected via wires so the extension leads are being used on "controller 2" for each system. These controllers work via the plug in adapters and introduce no lag as all. They're really well built and ooze OEM quality so I highly recommend them.
Read on to find out some hints'n'tips and links to great web resources:
- Official Nintendo Wii Sites:
- The Official Nintendo site
 Club Nintendo; of Europe (prev. Nintendo VIP, now My Nintendo)
- Nintendo Classic Mini
 Nintendo WiFi information
- AV Forums; great UK forum here
- Virtual Console Reviews and Hints; if you're into the retro side of things
- WiiWare World; news and info on Nintendo's newest Shop Channel offerings
- Wii Font; available as Light, Medium and Bold
- Nunchuk LED mod This mod adds colour to the analogue stick in the nunchuk and is very easy to do.
- Player Indicator LED Mod; This mod adds colour coding to the player lights (harder to do)
- Metacritic & GameRankings; wondering what game to buy next? These sites collate useful reviews from around the web
- To The Game; Release Dates for upcoming games are here
- GamesTracker; found the game you want? Use this site to track down the cheapest prices
- VG Chartz; worldwide sales figures: Wii 101.0M (37%), 360 85.8M (31%), PS3 86.8M (32%)
- Cubed3; worldwide news and info on the Nintendo consoles
- Eurogamer
How to perform an LED mod on your Wii peripherals.
Firstly, this mod was originally designed by me to be very energy efficient because having to continually replace/recharge batteries in the power hungry wiimotes gets tiresome after a while. Rather than simply just adding an LED to the test points inside a nunchuk, I added a 22Ω resistor (27p each) in series so that, from the 3.2v of the Wiimote, you'll be limiting the voltage drop across the LED to 2.8v and the current draw to 20mA. The advantage is that otherwise, the LED's may use up to 30mA...so I'm limiting them to 58% of their max power (P=I.V....max power of LED=[30x10-3]x3.2=96mW; whereas mine will use=[20x10-3]x2.8=56mW). This will conserve a little more battery power (although they use bugger all anyway....that's the advantage of them). As the current is reduced to 20mA, it should also make the light appear dimmer and a better match (luminosity wise) to the existing "Player Number" LED's on the wiimotes (the idea has caught on and now it's not unusual to see modders recommending adding resistors to their LED mods).So I bought some 7000mcd LED's from ebay (comes to 14p each). Here are the parts I used (4 22Ω resistors and 4 led's for the nunchuks). I STRONGLY recommend using electrical tape to insulate the legs of the led's:

Remember when opening the nunchuks to do so carefully and use a blunt knife to prise open the edges if you can't pull them apart (puttting them back together is easy).
The first piccie shows how I've soldered the resistor to the LED. When it comes to the currents we're talking about here, if you put the LED the wrong way round, as it's a diode, the worst that will happen is that no current will flow.....in which case it's like you haven't attached anything at all so no harm done. When you put the diode the right way round, the LED will light. WRT the resistor, it is in series which means it doesn't matter which LED leg you solder it to. Either -ve cathode or +ve anode, it won't make a difference at all....two of my 'chuks have the resistor soldered to the cathode leg, and 2 have it soldered to the anode leg (for example, 2 on the leg toward the microchip, 2 on the other leg further away).....all four light up EXACTLY the same.
Also, it doesn't matter which way round the resistor is arranged re: red band "toward" bulb or black band "toward" bulb...again, it doesn't matter with resistors.
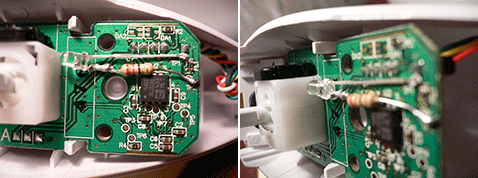
Now I haven't actually lifted mine up like the original tutorial, and the second piccie shows how I've actually laid mine very flat against the pcb to point toward the square bases and provide a more even spread of light (the white plastic base acts as a diffuser).
Finally, these two piccies were not actually left as they were. I obviously had to insulate each leg separately. The reason I took the 'chuk apart again shortly after initially modding it was because, whilst playing Zelda and shaking the 'chuk vigorously to perform "roundhouse swordsweeps", the legs on this particular 'chuk moved v v slightly. As I hadn't insulated them well enough, they had touched resulting in a short circuit. The nunchuk went "off" as did the wiimote. The game said "Please attach a nunchuk". Disconnecting the nunchuk resulted in the wiimote turning back on nice and fine as though nothing had happened.....which shows that at these voltages, it's a pretty safe design and the 'motes and 'chuks are quite robust. So I re-soldered....re-lagged and took new piccies. Here is a piccie of the actual insulation I have used (same as on the other three 'chuks). I used a piece of tape wrapped around each leg as well as a third piece to firmly tape it to the pcb. You could, of course, tape the legs before soldering and solder after it's all positioned as you want.
So here is a Warning: Ensure you insulate both legs of the LED's individually and fully. Even though a short didn't cause a permanent problem with either the 'chuk or the 'mote in my case, it's always better to be safe than sorry and do a better job initially. BTW: in case you're wondering, the motion sensing is not affected at all using this method. If done right, everything will work fine.
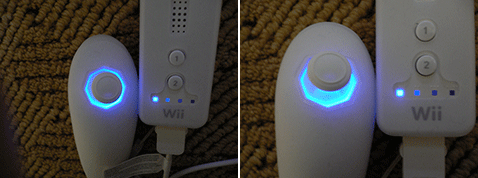
Here is the finished product: 
Here are close up piccies showing that (even though there's more "surface area" of light around the 'chuk) it's a very close match to the luminosity of light from the existing 'mote. Also, around the top of the stick, the light blue light becomes darker blue in colour...more noticeable in reality (the photo's don't do it justice), but it glows exactly the same way the drive on the Wii does....light blue to slightly darker blue at 11-1 o'clock.......actually more noticeable in the close up of all 4 'chuks above....look at the third 'chuk along):
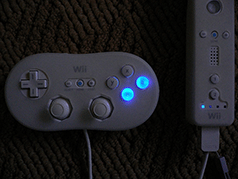
The reason I chose to mod the 'motes was that even if something went drastically wrong, they only cost about £15 to replace (unlike attempting to mod the console itself). So I thought I'd be a bit more adventurous and mod my classic controller too using the following method - I simply placed the LED in the centre of the ABXY buttons and used a resistor as per my 'chuks. The light will then illuminate A & B. When doing this, I made an extra change in covering the underside of the top case with black tape, cut to match. This is because, despite being lower power, the LED's still produce enough light to "shine through" the white casing of the controller. Using black tape blocks a lot of this "stray" light that would otherwise leak directly through:
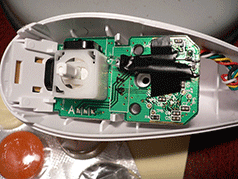
Now, intially I had done a "test-run" on a standard fully purple controller (see bottom), so now I thought I'd change that for an official one that had a clear see-through backing (still has the purple top cover though). So swapped mine for that, and of course, modded it as well. I tried the simple (non-resistor) mod is it is wired and gains it's power from the Wii, not batteries (so I'm not worried about current use here):

On the left is an internal shot (sorry it's a bit dark.....iPhoto should be able to lighten the image for you). Obviously, the piccie is just to show you where the points are. I've lagged the LED legs (like shown with the nunchuk) with insulation tape. Also, test beforehand to check the orientation of the "legs" (i.e. which "solder point" should be used for the anode leg and which one for the cathode leg). Once soldered, place your thumb on the legs (pushing against the circuit board) and use your other thumb to gently bend the "bulb" down 90deg so that it "folds" over the circuit board edge. Even then it was a very tight fit so I had to manually remove a few mm of circuit board using long nosed pliers to allow the case to fit back together snugly. Took a bit of time to do as everything is such a tight fit but well worth it when done imo (as you can see from the other 3 piccies - Blingtastic).
Here are some piccies of other controllers I have modded. On the left is that first "test-run" mod of mine on a standard (fully purple) NGC controller. The lack of a clear back casing means that the light doesn't show up too much during the daytime but on the plus side it's not too distracting at night (perfect). Unlike the one above where both LED's are positioned at the back, here I used one for the yellow c-stick and one for the grey analogue stick:
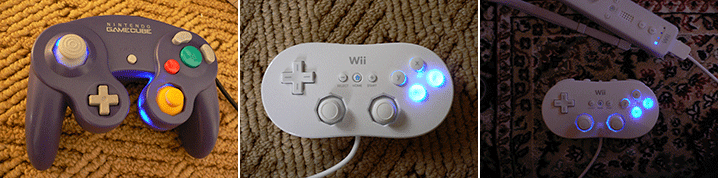
Just to drill home the importance of resistors, the middle photo is of a classic controller modded without using resistors. Compare this one to the piccie on the right (my resistor method used for my nephew's one) and you can see that despite the last one containing 2 LED's as opposed to one (and despite taking the photo in a darkened room and also not using masking tape to block stray light), it still looks massively better luminosity wise than the un-resistored mod.
Some final things to note:
The LED's are not "frosted".....they're clear glass, this will alter the characteristics of the glow (mine are more "direct" so I've pointed them towards the base).
I, unfortunately, used "standard" solder and a naff iron. This meant that it was a right bugger to solder the legs of the led's to the flat metal discs of the test points (this is what took me ages). A better soldering iron and using correct lead free solder would make the whole process quicker.
Finally, rather than using resistors, you could easily source less powerful LED's for a similar effect, but this won't "control" the current draw like mine do (most LED's nowadays work with varying currents rather than a fixed one).
I hope you found this useful...now get modding.
11th January 2007
